Getting Started with C# .NET
A Simple C# Console Application
A Console Application is one that looks like a DOS window. If you don't know what these are, click your Start menu in the bottom left of your screen. Click on Run. From the dialogue box that appears, type cmd:

In Vista and Windows 7, type cmd in the search box at the bottom of the start menu. In Windows 8, the search box is on the Start Screen page. You'll then see the search results appear:

Click cmd.exe to see the console appear.
Click OK and you'll see a black screen, like this one:

This is the type of window you'll see for our Console Application. When you create your Windows forms, there's a whole lot of code to get used to. But Console Applications start off fairly simple, and you can see which part of the programme is the most important.
So with Visual C# Express open, click File from the menu bar at the top. From the File menu, selectNew Project (or click the New Project link on the left of the opening screen in versions 2010 and 2012):

When you click on New Project, you'll see the following dialogue box appear:

Or this one in version 2010 of the software:

For 2012 users, click on Templates from the list on the left. Under Templates, click on Visual C#. You'll then see Console Application appear in the middle:
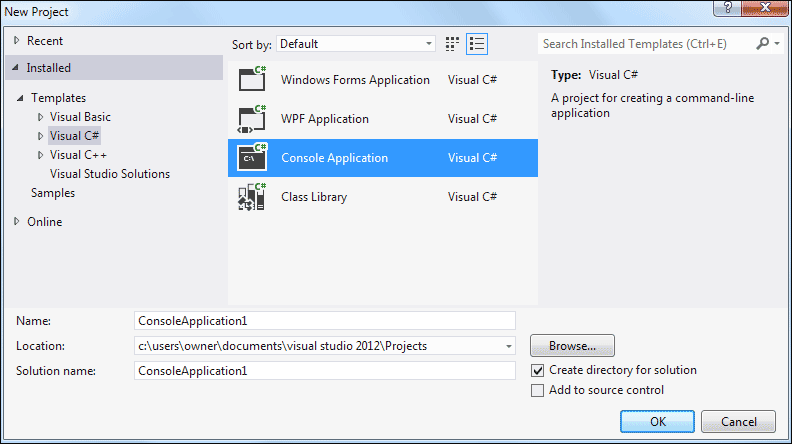
For all versions, the New Project dialogue box is where you select the type of project you want to create. If you only have the Express edition of Visual C#, the options are limited. For the rest of this book, we'll be creating Windows Applications. For now, select Console Application. Then click OK.
When you click OK, a new Console Application project will be created for you. Some code should be displayed:

As well as the code, have a look on the right hand side and you'll see the Solution Explorer. This is where all the files for your project are. (If you can't see the Solution Explorer, click View from the C# menu bar at the top. From the View menu, click Solution Explorer.)
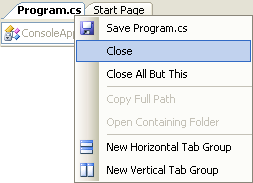
The code itself will look very complicated, if you're new to programming. We'll get to it shortly. For now, right click the Program.cs tab at the top, and click Close from the menu that appears:
Or just click the X in C# 2010 and 2012:

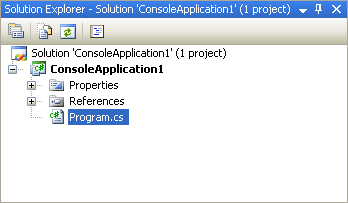
Now double click the Program.cs file in the Solution Explorer:
When you double click Program.cs, you should see the code reappear. So this code is the programme that will run when anyone starts your application.
Now click the plus symbol (arrow symbol in version 2012) next to Properties in the Solution Explorer above. You'll see the following:

The file called AssemblyInfo.cs contains information about your programme. Double click this file to open it up and see the code. Here's just some of it:

The reddish colour text is something you can change. You can add a Title, Description, Copyright, Trademark, etc.
But right click the AssemblyInfo.cs tab at the top, and click Close from the menu. Now, in the Solution Explorer, click the plus symbol next to References:

These are references to code built in to C# (you won't see as many entries in earlier versions of the software). Much later, you'll see how to add your own files to this section.
Before we add some code, let's save the project. We'll do that in the next part below.
Saving your workin C# .NET
When you save your work, C# will create quite a few folders and files for you. Click File from the menu bar at the top of the Visual C# Express software, then Save All:

When you click Save All, you'll see the following dialogue box appear Visual Studio Express 2008 and 2010: (2012 users won't need to do anything here, as this above information was displayed when you created a new project earlier.)

You can type any name you like for your project. The default Name is ConsoleApplication1. Have a look at the location of the project, though:
C:\Users\Owner\documents\visual studio 2010\Projects
In XP, however, you'll see something like this:
C:\Documents and Settings\kayspc\My Documents\Visual Studio 2008\Projects
So it's going to be saved to the "documents" folder of this computer. In the "documents" folder you'll find another one called Visual Studio 2010. In this folder there will be one called Projects.
Before clicking the Save button, make sure there is a tick in the box for "Create directory for solution". Then click Save.
Now open up Windows Explorer (Hold down the Windows key on your keyboard, then press the letter "e"). Navigate to the folder location above. In the image below, we've used Windows Explorer to navigate to the Visual Studio 2010 folder:

Double click the Projects folder to see inside of it. Your should see a folder calledConsoleApplication1. Double click this folder and you'll see the following:

So there's another folder called ConsoleApplication1. There's also two files: one that ends in sln, and one that ends in suo. The sln file is the entire solution. Have a look at the Solution Explorer again:

The one highlighted in blue at the top refers to the sln file. The suo file contains information about the Visual Studio environment - whether the plus symbols are expanded in the Solution Explorer, what other files you have open in this project, and a whole host of other settings. (If you can't see the suo file click Tools > Folder Option in Windows Explorer. In Vista and Windows 7, you may have to clickOrganise > Layout > Menu Bar first. Click the View tab, and select the option for "Show hidden files and folders".)
Double click your ConsoleApplication1 folder, though, to see inside of it:

Now we have three more folders and two files. You can see the bin and obj folders in the Solution Explorer:

Click ConsoleApplication1, second from the top. Then click the icon for Show all Files, circled in red in the image above. To see All Files in version 2012, click the symbol circled in the image below:

The bin and obj folders will appear. Click the plus symobol or arrows to see what's inside of these folders:

The important one for us is the Debug folder under bin (there'll be an extra file ending in .manifest in c# 2010). You'll see why it's important in a moment. However, it's time to write some code!
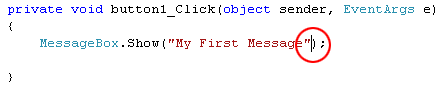
Position your cursor after the final double quote of "My First Message", circled in red in the image below:
 Now type a comma. As soon as you type a comma, you'll see the list of Show options again:
 Type the following:
 When your line of code looks like the one above, Run your programme again. Click your button and you should see a Title on your Message Box:

Return to your coding window. After the second double quote of the Title you've just added, type another comma. Hit the spacebar on your keyboard once, and you'll see the IntelliSense list appear. (If it doesn't appear, just type a capital letter "M").
 The one that adds buttons to a message box is, you won't be surprised to hear,MessageBoxButtons. Press the enter key on your keyboard when this option is highlighted. It will be added to the your code. Now type a full stop (period) after the final "s" of MessageBoxButtons. You'll see the button options:
 Double click the one for YesNo, and it will be added to your code.
Run your programme again, and click your button. Your Message Box will then look like this:

Type another comma after MessageBoxButtons.YesNo. After the comma, type a capital letter "M" again. From the IntelliSense list that appears, double click MessageBoxIcon. After MessageBoxIcon, type a full stop to see the available icons:
 We've gone for Asterisk. Double click this to add it to your code. Run your programme again to see what the icon looks like on your Message Box:
 Looks pretty impressive, hey! And all that with one line of code!
We'll move on to the important subject of variable, in the next part. First, try this Exercise.
Your first line of C# code
The only thing we'll do with the code is to write some text to the screen. But here's the code that Visual C# prepares for you when you first create a Console Application:
 For now, ignore the lines that start with using as we'll get to them later in the course. (The image above is from version 2012 - earlier versions will have fewer using lines) But they add references to in-built code. The namespace line includes the name of your application. A namespace is a way to group related code together. Again, don't worry about the term namespace, as you'll learn about these later.
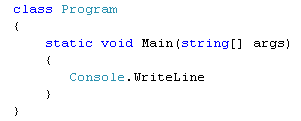
The thing that's important above is the word class. All your code will be written in classes. This one is called Program (you can call them anything you like, as long as C# hasn't taken the word for itself). But think of a class as a segment of code that you give a name to.
Inside of the class called Program there is this code:
But position your cursor after the first curly bracket, and then hit the enter key on your keyboard:
 The cursor automatically indents for you, ready to type something. Note where the curly brackets are, though, in the code above. You have a pair for class Program, and a pair for the Main method. Miss one out and you'll get error messages.
The single line of code we'll write is this (but don't write it yet):

 The icon to the left of the word Console on the list above means that it is a Class. But press the Enter key on your keyboard. The word will be added to your code:
 Now type a full stop (period) immediately after the word Console. The IntelliSense menu appears again:
 You can use the arrow keys on your keyboard to move up or down the list. But if you type Write and then the letter L of Line, IntelliSense will automatically move down and select it for you:

 Press the Enter key to add the word WriteLine to your code:
 Now type a left round bracket. As soon as you type the round bracket, you'll see this:
 WriteLine is another Method (A Method is just some code that does a particular job). But the yellow box is telling you that there are 19 different versions of this Method. You could click the small arrows to move up and down the list. Instead, type the following:
 Now type a right round bracket:
 Notice the red wiggly line at the end. This is the coding environment's way of telling you that you've missed something out.
The thing we've missed out is a semicolon. All complete lines of code in C# must end with a semicolon. Miss one out and you'll get error messages. Type the semicolon at the end and the red wiggly line will go away. Your code should now look like this:
 Note all the different colours. Visual C# colour-codes the different parts of your code. The reddish colour between double quotes means that you want text; the green colour means it's a Class; blue words are ones that C# reserves for itself.
(If you want, you can change these colours. From the menu bar at the top, click Tools > Options. Under Environment, click Fonts and Colors.)
Time now to Build and Run your code!
The thing that's important above is the word class. All your code will be written in classes. This one is called Program (you can call them anything you like, as long as C# hasn't taken the word for itself). But think of a class as a segment of code that you give a name to.
Inside of the class called Program there is this code:
static void Main(string[] args)
{
{
}
This piece of code is something called a Method. The name of the Method above is Main. When you run your programme, C# looks for a Method called Main. It uses the Main Method as the starting point for your programmes. It then executes any code between those two curly brackets. The blue words above are all special words - keywords. You'll learn more about them in later chapters.But position your cursor after the first curly bracket, and then hit the enter key on your keyboard:
The single line of code we'll write is this (but don't write it yet):
Console.WriteLine("Hello C Sharp!");
First, type the letter "C". You'll see a popup menu. This popup menu is called the IntelliSense menu. It tries to guess what you want, and allows you to quickly add the item from the list. But it should look like this, after you have typed a capital letter "C":
C# 2010
Older versions of C#
"Hello C Sharp!"
Don't forget the double quotes at the start and end. These tell C# that you want text. Your code will look like this:The thing we've missed out is a semicolon. All complete lines of code in C# must end with a semicolon. Miss one out and you'll get error messages. Type the semicolon at the end and the red wiggly line will go away. Your code should now look like this:
(If you want, you can change these colours. From the menu bar at the top, click Tools > Options. Under Environment, click Fonts and Colors.)
Time now to Build and Run your code!
How to Run your C# Programmes
You can test your programme a number of ways. First, though, it has to be built. This is when everything is checked to see if there are any errors. Try this:
 The final line is this:
Now try this:
Compile complete -- 1 errors, 0 warnings
Build: 0 succeeded or up-to-date, 1 failed, 0 skipped
So it's telling you that it couldn't build your solution because there was 1 error.
Put the semicolon back at the end of the line. Now click Debug from the menu at the top of Visual C# Express. From the Debug menu, select Start Debugging.
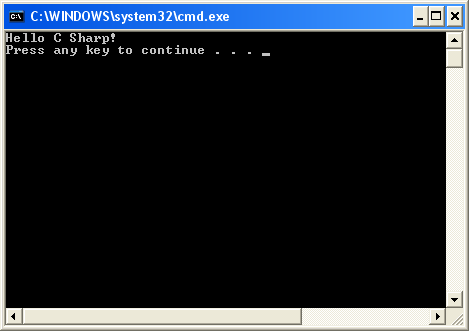
You should see a black DOS window appear and then disappear. Your programme has run successfully!
To actually see your line of text, click Debug > Start Without Debugging. You should now see this:
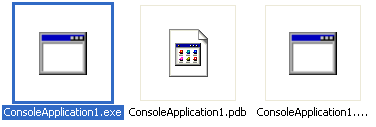
 And that's your programme! Have a look at the Solution Explorer on the right. Because the project has been built, you'll see two more files under Debug:
 However, in C# 2010 you'll see a Release folder. Expand this:
 We now have a ConsoleApplication1.exe and ConsoleApplication1.pdb. The exe file is an executable programme, and it appears in the bin/debug folder. Switch back to Windows Explorer, if you still have it open. You'll see the exe file there. (In the Release folder in C# 2010, but in the Debug folder in earlier versions):
 You could, if you wanted, create a desktop shortcut to this exe file. When you double click the desktop shortcut, the programme will run.
But that's enough of Console Applications - we'll move on to creating Windows Applications.
- From the View menu at the top of Visual C# Express, click Output. You�ll see a window appear at the bottom. (In C# 2010, if you can't see an Output entry, click the Tools menu. From the Tools menu, select Settings > Expert Settings. The Output menu item should then appear on the View menu.)
- From the Build menu at the top of Visual C# Express, click Build Solution
- You should see the following report:
Build: 1 succeeded or up-to-date, 0 failed, 0 skipped
That's telling you that everything is OK.Now try this:
- Delete the semicolon from the end of your line of code
- Click Build > Build Solution again
- Examine the output window (version 2012 of C# will just show and error and won't build)
Compile complete -- 1 errors, 0 warnings
Build: 0 succeeded or up-to-date, 1 failed, 0 skipped
So it's telling you that it couldn't build your solution because there was 1 error.
Put the semicolon back at the end of the line. Now click Debug from the menu at the top of Visual C# Express. From the Debug menu, select Start Debugging.
You should see a black DOS window appear and then disappear. Your programme has run successfully!
To actually see your line of text, click Debug > Start Without Debugging. You should now see this:
But that's enough of Console Applications - we'll move on to creating Windows Applications.
Your First C# Windows Form
From now on, we're going to be creating Windows Applications, rather than Console Applications. Windows Applications make use of something called a Form. The Form is blank at first. You then add control to your form, things like buttons, text boxes, menus, check boxes, radio buttons, etc. To get your first look at a Windows Form, do the following.
If you still have your Console Application open from the previous section, click File from the menu bar at the top of Visual C# Express. From the File menu, click on Close Solution.
To create your first Windows form project, click the File menu again. This time, select New Projectfrom the menu. When you do, you'll see the New Project dialogue box again:
 Or this one in C# 2010:
 In Visual Studio Express 2012, click Visual C#, under Templates on the left:
 In all versions, select Windows Forms Application (or Windows Application in earlier versions) from the available templates. Keep the Name on the default of WindowsFormsApplication1 and then click OK.
When you click OK, a new Windows Application project will be created for you:
 The obvious difference from the Console Application you created in the previous section is the blank Form in the main window. Notice the Toolbox, though, on the left hand side. We'll be adding controls from the Toolbox to that blank Form1 you can see in the image above.
If you can't see the Toolbox, you may just see the Tab, as in the following image:
 In C# 2010, your screen will look like this:
 If your screen looks like the one above, move your mouse over to the Toolbox tab. It will expand to look like the first one. If you want to permanently display the Toolbox, click on the pin symbol:
 Notice the Solution Explorer on the right side of your screen. (If you can't see the Solution Explorer, click its entry on the View menu at the top of Visual C# Express.) If you compare it with the Solution Explorer when you created your Console Application, you'll see there's only one difference - the Form.

 We still have the Properties, the References and the Program.cs file. Double click the Program.cs file to open it, and you'll see some familiar code:
 And here's the code from the Console Application:
 Both have the same using lines, a namespace, a class called Program, and a Main Method.
The Main Method is the entry point for your programme. The code between the curly brackets of Main will get executed when the programme first starts. The last line in the WindowsApplication1 code above is the one that Runs Form1 when the Application starts.
You can do other things here. For example, suppose you had a programme that connects to a server. If it finds a connection then it loads some information from a database. In the Main Method, you could check that the server connection is OK. If it's not, display a second form; if it's OK, then display the first form.
But don't worry if all that code has you scratching your head. The thing to bear in mind here is that a method called Main starts your programme. And Program.cs in the Solution Explorer on the right is where the code for Main lives.
But we won't be writing code in the Program.cs file, so we can close it. Have a look near the top of the coding window, and you'll some tabs:
 Right click the Program.cs tab and select Close from the menu that appears. You should now see your form again (you may have a Start tab as well. You can close this, if you want).
To see the window where you'll write most of your code, right click Form1.cs in the Solution Explorer:
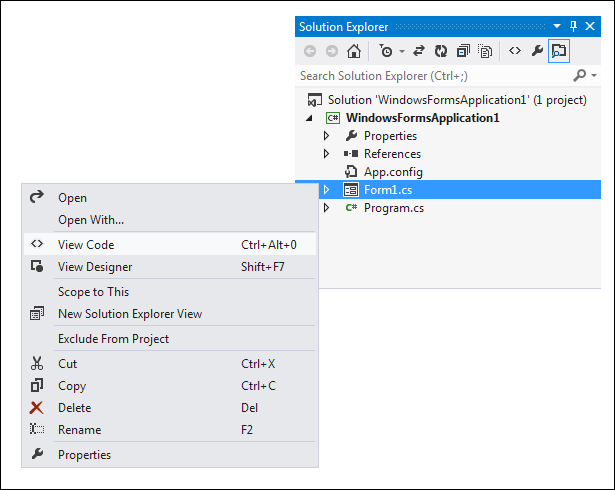 The menu has options for View Code and View Designer. The Designer is the Form you can see at the moment. Click View Code from the menu to see the following window appear (you can also press the F7 key on your keyboard in earlier versions, and CTRL + ALT + 0 in version 2012):
 This is the code for the Form itself. This Form (screenshot from version 2008):
 The code has a lot more using statements than before. Don't worry about these for now. They just mean "using some code that's already been written".
The code also says partial class Form1. It's partial because some code is hidden from you. To see the rest of it (which we don't need to alter), click the plus symbol next to Form1.cs in the Solution Explorer:
 Now double click Form1.Designer.cs. You'll see the following code:
 Again, you see partial class Form1, which is the rest of the code. Click the plus symbol next toWindows Form Designer generated code. You'll see the following:
 InitializeComponent is code (a Method) that is automatically generated for you when you create a new Windows Application project. As you add things like buttons and text boxes to your form, more code will be added here for you.
But you don't need to do anything in this window, so you can right click the Form1.Designer.cs tab at the top, and click Close from the menu.
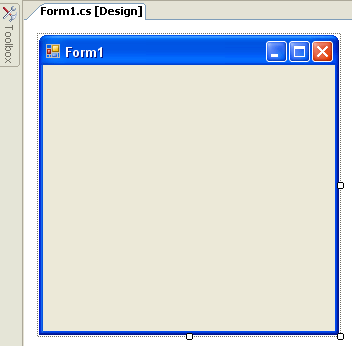
Click back on the Form1.cs tab at the top to see you form again. If the tab is not there, right click Form1.cs in the Solution Explorer on the right. From the menu, select View Designer. Here's what you should be looking at:
It's in Designer view that we'll be adding things like buttons and text boxes to our form. But you can run this programme as it is. From the Debug menu at the top, click Start Debugging (Or you can just press the F5 key on your keyboard.):
 When you click Start Debugging, Visual C# will Build the programme first, and then run it, if it can. If it can't run your programme you'll see error messages.
But you should see your form running on top of Visual Studio. It will have its own Red X, and it's own minimize and maximize buttons. Click the Red X to close your programme, and to return to Visual C# Express.
From now on, when we say Run your programme, this is what we mean: either press F5, or clickDebug > Start Debugging.
OK, time for you to start adding things to the form, and to do a little coding!
If you still have your Console Application open from the previous section, click File from the menu bar at the top of Visual C# Express. From the File menu, click on Close Solution.
To create your first Windows form project, click the File menu again. This time, select New Projectfrom the menu. When you do, you'll see the New Project dialogue box again:
When you click OK, a new Windows Application project will be created for you:
If you can't see the Toolbox, you may just see the Tab, as in the following image:
The Main Method is the entry point for your programme. The code between the curly brackets of Main will get executed when the programme first starts. The last line in the WindowsApplication1 code above is the one that Runs Form1 when the Application starts.
You can do other things here. For example, suppose you had a programme that connects to a server. If it finds a connection then it loads some information from a database. In the Main Method, you could check that the server connection is OK. If it's not, display a second form; if it's OK, then display the first form.
But don't worry if all that code has you scratching your head. The thing to bear in mind here is that a method called Main starts your programme. And Program.cs in the Solution Explorer on the right is where the code for Main lives.
But we won't be writing code in the Program.cs file, so we can close it. Have a look near the top of the coding window, and you'll some tabs:
To see the window where you'll write most of your code, right click Form1.cs in the Solution Explorer:
The code also says partial class Form1. It's partial because some code is hidden from you. To see the rest of it (which we don't need to alter), click the plus symbol next to Form1.cs in the Solution Explorer:
But you don't need to do anything in this window, so you can right click the Form1.Designer.cs tab at the top, and click Close from the menu.
Click back on the Form1.cs tab at the top to see you form again. If the tab is not there, right click Form1.cs in the Solution Explorer on the right. From the menu, select View Designer. Here's what you should be looking at:
But you should see your form running on top of Visual Studio. It will have its own Red X, and it's own minimize and maximize buttons. Click the Red X to close your programme, and to return to Visual C# Express.
From now on, when we say Run your programme, this is what we mean: either press F5, or clickDebug > Start Debugging.
OK, time for you to start adding things to the form, and to do a little coding!
Adding Controls to a Blank C# Form
The first thing we'll do is to add a button to the blank form. We'll then write a single line of code, so that you can see how things work.
If you want to add a control to a form, you can use the Toolbox on the left of Visual Studio. Move your mouse over to the Toolbox, and click the plus symbol next to Common Controls. You should see the following list of things that you can add to your form:
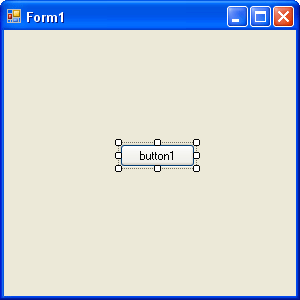
 Click the Button item under the Common Controls heading. This will select it. Now click once anywhere on your form. A button will be drawn for you, and your Form will look like this:
 (You can also hold down your left mouse button and drag out a button to the size you want it.)
A button is something you want people to click on. When they do, the code you write gets executed. The text on the button, which defaults to "button1", can be changed. You can add anything you like here, but it should be something that's going to be useful for your users, such as "Open a text file", or "Calculate Now".
We're going to display a simple message box when the button is clicked. So we need to add some text to the button. You do this by changing something called a property. This is quite easy, and you'll see how to do it in the next part of this lesson.
If you want to add a control to a form, you can use the Toolbox on the left of Visual Studio. Move your mouse over to the Toolbox, and click the plus symbol next to Common Controls. You should see the following list of things that you can add to your form:
A button is something you want people to click on. When they do, the code you write gets executed. The text on the button, which defaults to "button1", can be changed. You can add anything you like here, but it should be something that's going to be useful for your users, such as "Open a text file", or "Calculate Now".
We're going to display a simple message box when the button is clicked. So we need to add some text to the button. You do this by changing something called a property. This is quite easy, and you'll see how to do it in the next part of this lesson.
Properties of a C# Control
The controls you add to a form have something called Properties. A property of a control is things like its Height, its Width, its Name, its Text, and a whole lot more besides. To see what properties are available for a button, make sure the button is selected, as in the image below:
If a control is selected, it will have white squares surrounding it. If your button is not selected, simply click it once.
Now look in the bottom right of Visual C# Express, just below the Solution Explorer. You should see the Properties Window (if it's not there, select it from the View menu at the top. Again, 2010 users need to click Tools > Settings > Expert Settings to see the full list of menu items.):
 To view the list of Properties in alphabetical order, click the AZ symbol at the top, circled in red in the image below:
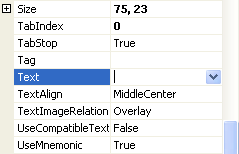
 As you can see, there's a lot of Properties for a button. Scroll down to the bottom and locate the TextProperty:
 The Text Property, as its name suggests, is the Text you want to appear on the button. At the moment, it says button1. Click inside of the text area of button1. Delete the default text:
 Now type the following:
 Now press the enter key on your keyboard. Have a look at your Form, and the Text on the button should have changed:
 There's a few more Properties we can change before we get to the code.
Locate Size in the Properties Window:
 The first number, 75, is the width of the button. The second number, 23, is the height of the button. The two numbers are separated by a comma. Change the numbers to 100, 30:
 Press the enter key again, and the size of your button will change:
 You can move your button around the Form by clicking it with the left mouse button to select it. Hold down you left mouse button and drag your button around the form. Let go of your left mouse button when you're happy with the new location.
Exercise
You can also move a button by changing its Location property. Use the Properties Window to change the Location of your button to a position on the form of 100, 50. (100 means 100 units from the left edge of the form; 50 means 50 units down from the top of the form.)
Exercise
A Form also has lots of Properties. Click away from the button and on to the Form itself. The Properties for the form will appear in the Properties Window. Change the Text Property of the Form toA First Message.
Exercise
The Form, like the button, also has a Size Property. Change the Size of the Form to 300, 200.
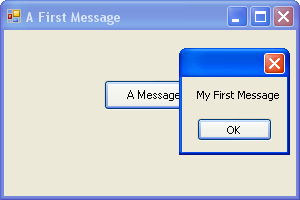
After you complete the three exercises above, your Form should look like this:
 When you changed the Text property of the Form, you changed the text that runs across the blue bar at the top, the text in white. You can type anything you like here, but it should be something that describes what the form is all about or what it does. Often, you'll see the name of the software here, like Microsoft Word, or Microsoft Visual C# 2010 Express Edition.
We can now move on to some code, though, and then run the Form to see what it all looks like.
Now look in the bottom right of Visual C# Express, just below the Solution Explorer. You should see the Properties Window (if it's not there, select it from the View menu at the top. Again, 2010 users need to click Tools > Settings > Expert Settings to see the full list of menu items.):
A Message
The Text part of your Properties Window will then look like this:Locate Size in the Properties Window:
Exercise
You can also move a button by changing its Location property. Use the Properties Window to change the Location of your button to a position on the form of 100, 50. (100 means 100 units from the left edge of the form; 50 means 50 units down from the top of the form.)
Exercise
A Form also has lots of Properties. Click away from the button and on to the Form itself. The Properties for the form will appear in the Properties Window. Change the Text Property of the Form toA First Message.
Exercise
The Form, like the button, also has a Size Property. Change the Size of the Form to 300, 200.
After you complete the three exercises above, your Form should look like this:
We can now move on to some code, though, and then run the Form to see what it all looks like.
Adding C# Code to a Button
What we want to do now is to display a message box whenever the button is clicked. So we need the coding window. To see the code for the button, double click the button you added to the Form. When you do, the coding window will open, and your cursor will be flashing inside of the button code. It will look like this:
 The only difference from the last time you saw this screen is the addition of the code for the button. This code:
The _Click part after button1 is called an Event. Other events are MouseDown, LocationChanged, TextChanged, and lots more. You'll learn more about Events later.
After _Click, and in between a pair of round brackets, we have this:
Notice that there is a pair of curly brackets for the button code:
private void button1_Click(object sender, EventArgs e)
{
{
}
This is just another Method, a piece of code that does something. The name of the Method isbutton1_Click. It's called button1 because that's currently the Name of the button. When you changed the Text, Location, and Size properties of the button, you could have also changed the Name property from button1 (the default Name) to something else.The _Click part after button1 is called an Event. Other events are MouseDown, LocationChanged, TextChanged, and lots more. You'll learn more about Events later.
After _Click, and in between a pair of round brackets, we have this:
object sender, EventArgs e
These two are know as arguments. One arguments is called sender, and the other is called e. Again, you'll learn more about arguments later, so don't worry about them for now.Notice that there is a pair of curly brackets for the button code:
private void button1_Click(object sender, EventArgs e)
{
{
}
If you want to write code for a button, it needs to go between the two curly brackets. We'll add a single line of code in the next part below.A C# MessageBox
We want to display a message box, with some text on it. This is quite easy to do in C#.
Position your cursor between the two curly brackets. Then type a capital letter "M". You'll see the IntelliSense list appear:
 Now type "ess" after the "M". IntelliSense will jump down:
 The only options that start with Mess are all Message ones. The one we want is MessageBox. You can either just type the rest, or even easier is to press the down arrow on your keyboard to move down to MessageBox:
 When you have MessageBox selected, hit the enter key on your keyboard (or double click the entry on the list). The code will be added for you:
 Now type a full stop (period) after the "x" of MessageBox. The IntelliSense list will appear again:
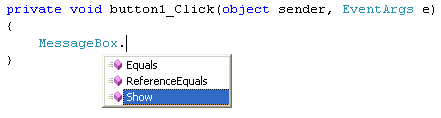 There are only three items on the list now, and all Methods (you can tell they are Methods because they have the purple block icon next to them) Double click on Show, and it will be added to your C# code:
 Because Show is a Method, we need some round brackets. The text for our message box will go between the round brackets. So type a left round bracket, just after the "w" of "Show":
 As soon as you type the left round bracket after the "w", you'll see all the different ways that the Show method can be used. There are 21 different ways in total. Fortunately, you don't have to hunt through them all! Type the following, after the left round bracket (Don't forget the double quotation marks.):
 The text in the dark reddish colour is what will be displayed in your message box. To try it out, save your work by clicking File from the menu bar at the top of Visual Studio. From the File menu, clickSave All. You'll then see the same Save box you saw for the Console Application. Save the project.
Run your programme by clicking Debug > Start Debugging. Or just press the F5 key on your keyboard. Your programme will look like this:
 Click your button to see your Message Box:
Congratulations! It's your first message! In the next part, we'll explore other things you can do with a message box.
Position your cursor between the two curly brackets. Then type a capital letter "M". You'll see the IntelliSense list appear:
"My First Message"
After the final double quote mark, type a right round bracket. Then finish off the line by typing a semi-colon ( ; ), Your coding window will then look like this:Run your programme by clicking Debug > Start Debugging. Or just press the F5 key on your keyboard. Your programme will look like this:
More about the C# MessageBox
If you look at the message box we created in the previous section, you'll notice there's no Title in the blue area to the left of the red X - it's blank:
You can add a Title quite easily.
Click OK on your Message Box. Then click the Red X on your programme to exit it. This will return you to Visual C#. Go back to the coding window (press F7 on your keyboard, if you can't see it).Position your cursor after the final double quote of "My First Message", circled in red in the image below:
"Message"
Again, you need the double quotes. But your line of code should look like this:Other Button Options
Rather than having just an OK button, you can add buttons like Yes, No, and Cancel to your C# message boxes. We'll add a Yes and a No button.Return to your coding window. After the second double quote of the Title you've just added, type another comma. Hit the spacebar on your keyboard once, and you'll see the IntelliSense list appear. (If it doesn't appear, just type a capital letter "M").
Run your programme again, and click your button. Your Message Box will then look like this:
Adding Icons to a C# Message Box
Another thing you can add to brighten up your Message Box is an Icon. It's easier to see what these are than to explain!Type another comma after MessageBoxButtons.YesNo. After the comma, type a capital letter "M" again. From the IntelliSense list that appears, double click MessageBoxIcon. After MessageBoxIcon, type a full stop to see the available icons:
We'll move on to the important subject of variable, in the next part. First, try this Exercise.
Variables in C#
String Variables in C#.NET
The first type of variable we'll take a look at is called a String. String variables are always text. We'll write a little programme that takes text from a text box, store the text in a variable, and then display the text in a message box.
But bear in mind that a variable is just a storage area for holding things that you'll need later. Think of them like boxes in a room. The boxes are empty until you put something in them. You can also place a sticker on the box, so that you'll know what's in it. Let's look at a programming example.
If you've got your project open from the previous section, click File from the menu bar at the top of Visual C#. From the File menu, click Close Solution. Start a new project by clicking File again, thenNew Project. From the New Project dialogue box, click on Windows Application. For the Name, typeString Variables.
Click OK, and you'll see a new form appear. Add a button to the form, just like you did in the previous section. Click on the button to select it (it will have the white squares around it), and then look for the Properties Window in the bottom right of Visual Studio. Set the following Properties for your new button:
 We can add two more controls to the form, a Label and a Text Box. When the button is clicked, we'll get the text from the text box and display whatever was entered in a message box.
A Label is just that: a means of letting your users know what something is, or what it is for. To add a Label to the form, move your mouse over to the Toolbox on the left. Click the Label item underCommon Controls:
 Now click once on your form. A new label will be added:
 The Label has the default text of label1. When your label is selected, it will have just the one white square in the top left. When it is selected, the Properties Window will have changed. Notice that the properties for a label are very similar to the properties for a button - most of them are the same!
Change the following properties of your label, just like you did for the button:
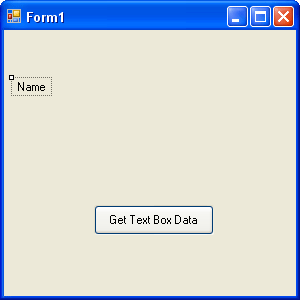 Move your mouse back over to the Toolbox. Click on the TextBox entry. Then click on your form. A new Text Box will be added, as in the following image:
 Instead of setting a location for your text box, simply click it with your left mouse button. Hold your left mouse button down, and the drag it just to the right of the Label.
Notice that when you drag your text box around, lines appear on the form. These are so that you can align your text box with other controls on the form. In the image below, we've aligned the text box with the left edge of the button and the top of the Label.
 OK, time to add some code. Before you do, click File > Save All from the menu bar at the top of Visual C#. You can also run your programme to see what it looks like. Type some text in your text box, just to see if it works. Nothing will happen when you click your button, because we haven't written any code yet. Let's do that now. Click the red X on your form to halt the programme, and you'll be returned to Visual C#.
But bear in mind that a variable is just a storage area for holding things that you'll need later. Think of them like boxes in a room. The boxes are empty until you put something in them. You can also place a sticker on the box, so that you'll know what's in it. Let's look at a programming example.
If you've got your project open from the previous section, click File from the menu bar at the top of Visual C#. From the File menu, click Close Solution. Start a new project by clicking File again, thenNew Project. From the New Project dialogue box, click on Windows Application. For the Name, typeString Variables.
Click OK, and you'll see a new form appear. Add a button to the form, just like you did in the previous section. Click on the button to select it (it will have the white squares around it), and then look for the Properties Window in the bottom right of Visual Studio. Set the following Properties for your new button:
Name: btnStrings
Location: 90, 175
Size: 120, 30
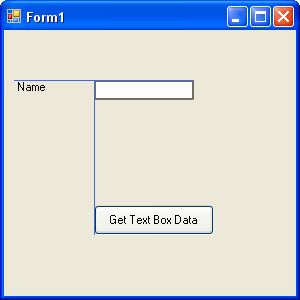
Text: Get Text Box Data
Your form should then look like this:Location: 90, 175
Size: 120, 30
Text: Get Text Box Data
A Label is just that: a means of letting your users know what something is, or what it is for. To add a Label to the form, move your mouse over to the Toolbox on the left. Click the Label item underCommon Controls:
Change the following properties of your label, just like you did for the button:
Location: 10, 50
Text: Name
You don't really need to set a size, because Visual C# will automatically resize your label to fit your text. But your Form should look like this:Text: Name
Notice that when you drag your text box around, lines appear on the form. These are so that you can align your text box with other controls on the form. In the image below, we've aligned the text box with the left edge of the button and the top of the Label.
0 comments:
Post a Comment